 BetaLobby
Uploading your first Android App Bundle (.aab) to Google Play Console rarely works on the first try. Even when a build compiles without a single error locally, Play Console runs its own checks on signing keys, package names, version codes, native .so alignment, and manifest permissions.
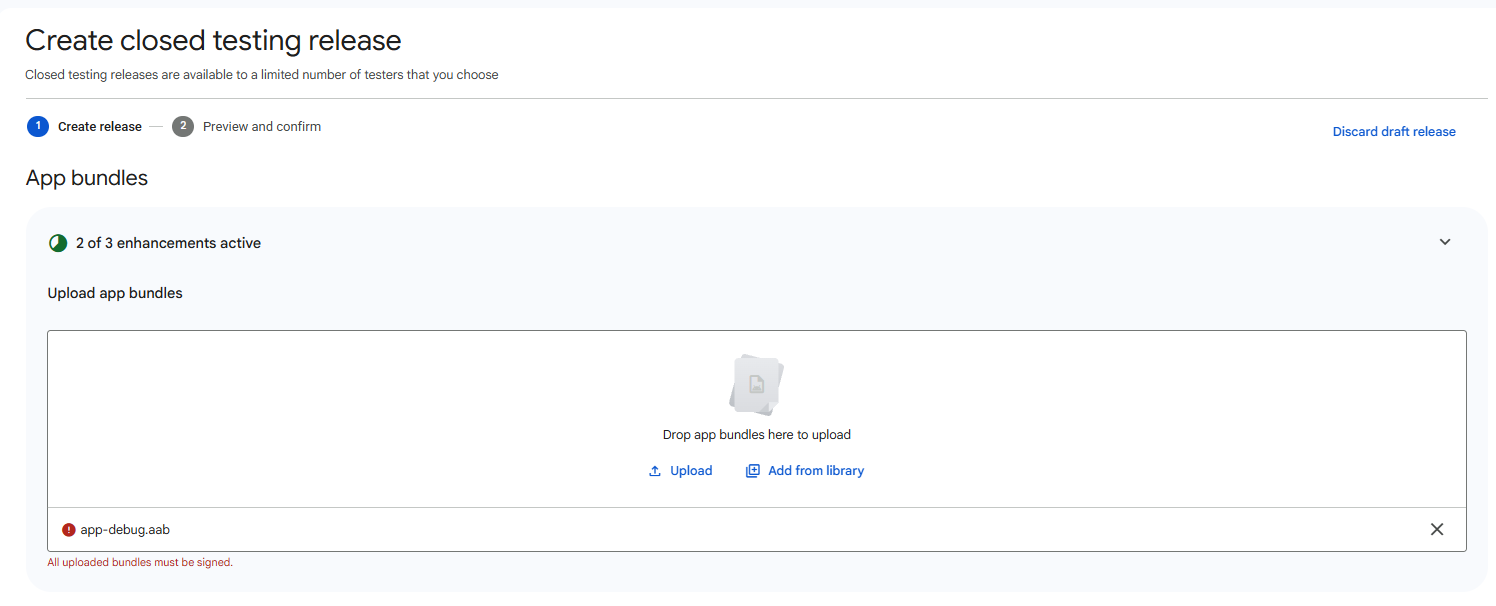
Every release goes through two steps at the top of the screen, and each step catches a different class of problems:
- Step 1 — Create release: checks the
.aabfile the moment you drop it into App bundles. Signing mistakes,.apkfiles, restricted package names, and duplicateversionCodevalues fail right here in red text under the upload box. - Step 2 — Preview and confirm: checks policy and track rules after you click Next. Target API level (
35/36), 16 KB memory page sizes, 64-bit native code, undeclared manifest permissions (AD_ID, foreground services, media permissions), and non-blocking yellow warnings appear here.
Use the table below to jump straight to the message on your screen, or Ctrl+F (Cmd+F) the exact text from Play Console.
| What Play Console says | Where it appears | Jump to |
|---|---|---|
All uploaded bundles must be signed. / signed in debug mode / debuggable |
Step 1: Dropzone | Section 1 |
signed with the wrong key (SHA1) / expires too soon / recently reset |
Step 1: Dropzone | Section 2 |
"com.example" is restricted / needs to have the package name / already exists |
Step 1: Dropzone | Section 3 |
Version code … has already been used / doesn't allow any existing users to upgrade |
Step 1 & Step 2 | Section 4 |
Recompile your app with 16 KB native library alignment |
Step 2: Review | Section 5 |
must target at least API level 35 (36) / 64-bit requirement / 200 MB |
Step 1 & Step 2 | Section 6 |
com.google.android.gms.permission.AD_ID / permissions that haven't been declared |
Step 2: Review | Section 7 |
no deobfuscation file (R8/proguard) / not uploaded debug symbols |
Step 2: Yellow warning | Section 8 |
Required hardware feature declarations… (android.hardware.screen.portrait / Android XR) |
Publishing overview | Section 9 |
1Unsigned, debug-signed, or debuggable bundles
First-time uploads fail here more than anywhere else, especially in Flutter, React Native, and Unity projects where a local release build can still carry debug settings.
Unsigned bundle
All uploaded bundles must be signed.
(Via the Publishing API or CI tools such as Fastlane and Gradle Play Publisher: The Android App Bundle was not signed.)
- Cause: The
.aabhas no cryptographic signature (./gradlew bundleReleaseran without asigningConfig, orkey.propertieswas ignored in CI). - Fix: In Android Studio, use Build > Generate Signed App Bundle or APK (
release), or wiresigningConfigs.releaseintobuildTypes.release. In Expo, build witheas build --platform android --profile production.
Signed in debug mode (androiddebugkey)
You uploaded an APK or Android App Bundle that was signed in debug mode. You need to sign your APK or Android App Bundle in release mode.
- Cause: #1 Flutter and React Native starter trap.
flutter createsetssigningConfig = signingConfigs.getByName("debug")insidebuildTypes.releasesoflutter build appbundle --releasesucceeds out of the box—signed with Android's default debug key. - Fix: Generate an upload keystore (
.jks), configureandroid/key.properties, and pointbuildTypes.release.signingConfiginandroid/app/build.gradle(.kts)to yourreleaseconfig instead ofdebug.
Debuggable flag enabled (android:debuggable="true")
You uploaded a debuggable APK or Android App Bundle. For security reasons you need to disable debugging before it can be published in Google Play.
- Cause: You uploaded
app-debug.aabfrombuild/outputs/bundle/debug/, hardcodedandroid:debuggable="true"inAndroidManifest.xml, or left Development Build checked in Unity (File > Build Settings). - Fix: Upload from
bundle/release/, remove any manualandroid:debuggable="true", and uncheck Development Build in Unity.
Uploaded .apk instead of .aab (or Play App Signing not enrolled)
Upload a valid app bundle/Invalid file type: Since August 2021, new apps on Google Play must publish.aabbundles rather than.apkfiles. Runflutter build appbundle --release(notbuild apk), remove"buildType": "apk"from production ineas.json, or check Build App Bundle (Google Play) in Unity.To upload an Android App Bundle you must be enrolled in Play App Signing.: Happens when pushing a very first.aabvia CI/API before initializing the app's release setup in the Play Console web UI. Open Play Console once in a browser to complete enrollment.
For copy-paste keytool commands and complete key.properties / build.gradle snippets across Flutter, Android Studio, Expo, and Unity, see Signed in Debug Mode or Unsigned AAB on Google Play.
2Wrong signing key (SHA-1 mismatch) and certificate errors
Once you upload your first signed .aab, Play Console locks that certificate's SHA-1 fingerprint as your upload key. Every future update must be signed with that exact keystore.
Wrong upload key (SHA1 mismatch)
Your Android App Bundle is signed with the wrong key. Ensure that your App Bundle is signed with the correct signing key and try again. Your App Bundle is expected to be signed with the certificate with fingerprint: SHA1: <EXPECTED_SHA1> but the certificate used to sign the App Bundle you uploaded has fingerprint: SHA1: <ACTUAL_SHA1>
- Cause: Switched computers, generated a new
.jks, picked the wrong key alias, or switched between local Gradle signing and EAS / CI-managed credentials. - Fix:
- Check your local keystores with
keytool -list -v -keystore your-upload-key.jksto find the one matching<EXPECTED_SHA1>. - If the original keystore is permanently lost, Play App Signing lets you recover: generate a new 2048-bit keystore, export its certificate (
keytool -export -rfc -keystore new.jks -alias upload -file upload_cert.pem), and open Protected with Play > Play Store protection > Manage Play app signing (moved from Test and release > App integrity), then click Request reset under Upload key.
- Check your local keystores with
48-hour cooldown right after resetting your upload key
You uploaded an app bundle that is signed with an upload certificate that is not yet valid because it has been recently reset. You will be able to upload app bundles again from <Date/Time> UTC.
- Fix: Do not generate another key. After approving an upload key reset, Google enforces a 48-hour security cooldown. Wait until the exact UTC timestamp shown in the message, then re-upload the exact same
.aab.
Other certificate rejections
- Expires too soon (
You uploaded an APK or Android App Bundle signed with a certificate that expires too soon...): Google Play requires certificates to remain valid past October 22, 2033. Runningkeytool -genkeypairwithout-validitydefaults to 90 days—always pass-validity 10000(27+ years). - Not yet valid (
...signed with a certificate that is not yet valid...): Your build machine's clock was set ahead of real UTC time when generating the keystore. Sync OS time via NTP and generate a fresh keystore. - Weak key (
Your Android App Bundle uses an upload certificate with a key that is too weak.): Key is 1024-bit RSA; regenerate with-keyalg RSA -keysize 2048. - Corrupted signature (
...invalid or missing signing information for some of its files...): Files inside the.aabwere modified after signing (common with third-party APK/AAB wrappers or stale build caches). Run a clean build and never apply third-party packers to Google Play bundles.
For the full keytool fingerprint check, PEM export, and Play App Signing reset walkthrough, see Android App Bundle Signed with the Wrong Key (SHA1 Fix).
3Package name errors (com.example, mismatch, or already taken)
A package name (applicationId) uniquely identifies your app across Google Play forever. Once the first bundle is uploaded—or locked during app creation—it cannot be changed on that app entry.
Restricted placeholder namespace
You need to use a different package name because "com.example" is restricted.
- Fix: Change
applicationIdinapp/build.gradle(.kts)(orexpo.android.packageinapp.json, or Package Name in Unity Player Settings) fromcom.example.*to your own reverse-domain ID (com.yourbrand.app), updategoogle-services.jsonif you use Firebase, and rebuild.
Mismatch with the app's registered package name
Your APK or Android App Bundle needs to have the package name <com.yourcompany.app>.
- Cause: Uploading to the wrong app in Play Console, leaving an unintended
applicationIdSuffix(such as.debugor.staging) on the build variant, or changingapplicationIdin code after locking a different name in Play Console. - Fix: Match
applicationIdcharacter for character with the package name shown under the app title in Play Console. If the Play Console app is still an unpublished draft with the wrong package name, create a new app entry instead.
Package name already claimed on Google Play
You need to use a different package name because "<com.yourcompany.app>" already exists in Google Play.
(Or …is already used by one of your other applications. if claimed by another draft in your own account.)
- Cause: Very common with template IDs (
io.ionic.starter,com.company.appname) or generic names. Package names on Google Play are globally unique and are never released, even if the previous app was unpublished. - Fix: Pick a unique reverse-domain
applicationIdand rebuild.
4Duplicate version code and upgrade shadowing
Play Console tracks builds by their integer versionCode (1, 2, 3…), not the user-visible string versionName (1.0.0, 1.0.1).
Version code already used
Version code <X> has already been used. Try another version code.
- Cause: Every
.aabever uploaded into Play Console permanently reserves itsversionCodein App bundle explorer—even if you clicked Discard draft release and never published it, or uploaded it to Internal testing earlier. Changing1.0.0to1.0.1without incrementing the integerversionCodetriggers this every time. - Fix (pick the right one):
- Same build, promoting or resuming a discarded draft: Do not re-upload the
.aabfile. Click Add from library inside the upload box and select the bundle that's already in Play Console. - Changed code and rebuilt: Increment the integer by
+1—versionCodeinbuild.gradle, the number after+in Flutter'spubspec.yaml(version: 1.0.1+2),android.versionCodein Expoapp.json, or Bundle Version Code in Unity.
- Same build, promoting or resuming a discarded draft: Do not re-upload the
No upgrade path (version shadowing)
You can't rollout this release because it doesn't allow any existing users to upgrade to the newly added app bundles.
- Cause: You selected a bundle whose
versionCodeis lower than the currently active release on that track, clicked Next without adding a newer bundle, or narrowedminSdkVersion/<uses-feature>so existing users cannot upgrade. - Fix: Upload or select a bundle with a
versionCodestrictly higher than the active bundle on that track, and remove any shadowed lower-version bundle from the draft.
For step-by-step version bumping across Flutter, Gradle, Expo, and Unity—plus how Add from library works—see "Version code has already been used" on Play Console.
516 KB memory page size alignment
For apps targeting Android 15 (API level 35) and higher, this is the single most common blocker across Flutter, Unity, React Native, and native NDK apps in 2025–2026:
Recompile your app with 16 KB native library alignment
Your app uses native libraries that are not aligned to support devices with 16 KB memory page sizes. These devices may not be able to install or start your app, or the app may start and then crash.
(In App bundle explorer or Policy status, it also appears as App must support 16 KB memory page sizes or Does not support 16 KB.)
Even if you wrote zero C or C++ code yourself, game engines, cross-platform runtimes (libflutter.so, libil2cpp.so, libreactnative.so), and camera, database, or ML plugins bundle 64-bit .so files that used to be compiled with 4 KB ELF alignment.
- Step 1: Expand Libraries that do not support 16 KB: on the release screen to see the exact
.sofiles failing the check. - Step 2 (upgrade your toolchain and offending SDKs):
- Android Studio / Native: Upgrade Android Gradle Plugin (AGP) to
8.5.1+(handles uncompressed.sozip alignment) and NDK tor28+(compiles 16 KB ELF alignment by default; on NDKr27, pass-Wl,-z,max-page-size=16384). Update any third-party Maven dependency listed under offending libraries. - Flutter: Upgrade to Flutter
3.27+/3.29+, bump AGP to8.5.1+and NDK tor28+inandroid/settings.gradleandbuild.gradle, and runflutter pub upgradefor native plugins. - Expo / React Native: Upgrade to Expo SDK
52+/53+(React Native0.77+). - Unity: Rebuild with a 16 KB-patched editor (Unity
6000.0.38f1+,2022.3.56f1+, or2021.3.48f1+).
- Android Studio / Native: Upgrade Android Gradle Plugin (AGP) to
For how to inspect offending .so files, handle unpatched third-party SDKs, and clear stale 4 KB bundles on test tracks, see Recompile Your App with 16 KB Native Library Alignment.
6Target API level (35 / 36), 64-bit, and the 200 MB limit
Target API level too low
Your app currently targets API level <34> and must target at least API level <35> to ensure it is built on the latest APIs optimized for security and performance. Change your app's target API level to at least <35>.
- Cause: Google Play raises its minimum
targetSdkVersionevery August 31 (with extensions until November 1)—requiring API level 35 (Android 15) in 2025/2026 and API level 36 (Android 16) from late August 2026. - Fix: Update
compileSdkandtargetSdkinbuild.gradle(.kts)(or upgrade your Flutter / Expo SDK / Unity Target API Level), and test Android 15+ edge-to-edge system bar insets before rolling out.
64-bit requirement
This release is not compliant with the Google Play 64-bit requirement.
- Cause: Shipping 32-bit native libraries (
armeabi-v7a) without matching 64-bit libraries (arm64-v8a). Most common in Unity when Scripting Backend is left onMonoinstead ofIL2CPP. - Fix: In Unity, switch Scripting Backend to
IL2CPPand checkARM64. In Gradle, ensurendk.abiFiltersincludes"arm64-v8a".
200 MB compressed base module limit
Some feature modules of your app bundle exceed the maximum compressed download size (200 MB). Reduce the sizes of these modules: base.
- Fix: Enable R8 shrinking (
isMinifyEnabled = true,isShrinkResources = true), compress bundled textures/audio/video, and move large game or on-device AI assets into Play Asset Delivery (PAD) asset packs or download them from a CDN on first launch.
7Advertising ID and sensitive permission blockers
On Step 2 (Preview and confirm), Play Console cross-checks the merged AndroidManifest.xml inside your .aab against your declarations under Monitor and improve > Policy and programs > App content.
The hidden multi-track trap: Play Console checks every active bundle across all tracks (Production, Open testing, Closed testing, and Internal testing). If you removed a restricted permission in
versionCode 5on Closed testing, an olderversionCode 2still sitting active on Internal testing will keep blocking you until you supersede or pause that track too.
Advertising ID (com.google.android.gms.permission.AD_ID) mismatch
- Declared "No", but present in manifest:
This release includes the com.google.android.gms.permission.AD_ID permission but your declaration on Play Console says your app doesn't use advertising ID. You must update your advertising ID declaration.
- Cause: AdMob, Firebase Analytics, Crashlytics, or Unity Ads automatically merge
AD_IDinto your manifest. - Fix: If you use analytics or ads, update App content > Advertising ID to Yes and select the matching purpose (Analytics or Advertising or marketing). If you use neither, strip it in
AndroidManifest.xmlwith<uses-permission android:name="com.google.android.gms.permission.AD_ID" tools:node="remove" />.
- Cause: AdMob, Firebase Analytics, Crashlytics, or Unity Ads automatically merge
- Declared "Yes", but missing from manifest:
Your advertising ID declaration in Play Console says that your app uses advertising ID. A manifest file in one of your active artifacts doesn't include the com.google.android.gms.permission.AD_ID permission.
- Fix: Add the
AD_IDpermission toAndroidManifest.xml(and supersede any older test-track bundle missing it), or change the declaration to No.
- Fix: Add the
Undeclared sensitive permissions (FOREGROUND_SERVICE_*, READ_MEDIA_IMAGES, REQUEST_INSTALL_PACKAGES)
This release includes permissions that haven't been declared in Play Console. Go to Sensitive app permissions to update your permission declarations.
READ_MEDIA_IMAGES/READ_MEDIA_VIDEO: Do not submit the declaration form if your app only lets users pick an avatar, chat photo, or feedback screenshot—Google rejects non-gallery apps (Photo and Video Permissions policy: Permission use is not directly related to your app's core purpose). Upgrade your image-picker library to use the zero-permission Android Photo Picker and strip leftover media permissions withtools:node="remove".REQUEST_INSTALL_PACKAGES: Often pulled in by self-update or file-opener plugins (open_file,ota_update). Self-updating APKs are prohibited on Google Play; remove the plugin/permission and use the Play In-App Updates API.FOREGROUND_SERVICE_*(API 34+): Remove unused background-service permissions injected by plugins, or complete App content > Foreground service permissions with a public video link clearly showing the user starting the feature and the persistent notification in the shade.
8Yellow warnings you can safely ignore for now (R8 and debug symbols)
Almost every first-time Flutter, Unity, React Native, or Capacitor developer panics when Preview and confirm displays one or both of these yellow cards under Warnings:
There is no deobfuscation file associated with this App Bundle. If you use obfuscated code (R8/proguard), uploading a deobfuscation file will make crashes and ANRs easier to analyze and debug. Using R8/proguard can help reduce app size.
This App Bundle contains native code, and you've not uploaded debug symbols. We recommend you upload a symbol file to make your crashes and ANRs easier to analyze and debug.
- Can you publish anyway? Yes. Yellow warnings never block saving, rolling out a test track, or passing Google's review.
- How to clear them later:
- Deobfuscation (
mapping.txt): EnableisMinifyEnabled = trueandisShrinkResources = trueinsidebuildTypes.releaseinapp/build.gradle.kts(minifyEnabled true/shrinkResources truein Groovybuild.gradle). Modern Android Gradle Plugin automatically bundlesmapping.txtinside the.aab(always smoke-test an R8 build on internal testing first). - Native debug symbols: Add
ndk { debugSymbolLevel = "SYMBOL_TABLE" }insidebuildTypes.release(with Android NDK installed) so Gradle embeds symbols into the.aabautomatically, or uploadnative-debug-symbols.zipmanually in App bundle explorer.
- Deobfuscation (
9Publishing overview blocker: android.hardware.screen.portrait and Android XR
Even after your .aab clears Create release and Preview and confirm, Publishing overview can grey out Submit 1 change for review with a red 1 issue found banner (Required hardware feature declarations are restricting your app's availability — `android.hardware.screen.portrait` affects Phone, Tablet, Desktop, and Android XR users).
- Send the current
.aabimmediately (no rebuild): Click View issues → Proceed anyway, select a reason in the Ignore this issue dialog (such as I already have plans to resolve this issue) and click Ignore issue, then click Submit 1 change for review—no newversionCodeneeded. - Clear it permanently in your next release: Add
<uses-feature android:name="android.hardware.screen.portrait" android:required="false" />inside<manifest>inAndroidManifest.xmlsoAAPT2stops treatingandroid:screenOrientation="portrait"as a hard hardware filter. See Play Console android.hardware.screen.portrait & XR Fix for screenshots and Expo, Flutter, Gradle, and Unity configs.
Uploaded cleanly? What comes next
Getting your .aab past Preview and confirm is only half of launching on a personal developer account. Right after your first closed testing release goes live, three follow-up steps catch almost as many people:
- If your app has a login (including Google Sign-In only), fill in Sign in details before review gets stuck—see Play Console "Sign in details" (App access): What to Write.
- When testers open your opt-in link, make sure your Google Group, countries/regions, and Publishing overview approvals are all live so they don't hit a dead link—see "Item not found" in Google Play closed or internal testing.
- Run your closed test with at least 12 testers for 14 days continuously before you apply for access to production—see 12 Testers for 14 Days: What "Continuously" Really Means.
Finding 12 reliable testers on your own is often harder than fixing the build: friends and family are either on iPhones or stop opening the app after day two, and trading tests one by one in forums often leaves you with people who opt in without installing, uninstall early, or never open the app at all. BetaLobby (free, no paid plans) puts 16 developers into one Team mode squad using a single shared Google Group, verifies real installs without screenshots, and tracks daily check-in activity across all 14 days so you can see your app is actually being opened every day.