 BetaLobby
Building an Android App Bundle (.aab) in release mode locally does not guarantee it is signed for Google Play. Many project templates either leave the release variant completely unsigned or wire it to Android's default debug.keystore so local test runs work out of the box—until you drop the .aab into App bundles on Create release and Play Console rejects it in red text.
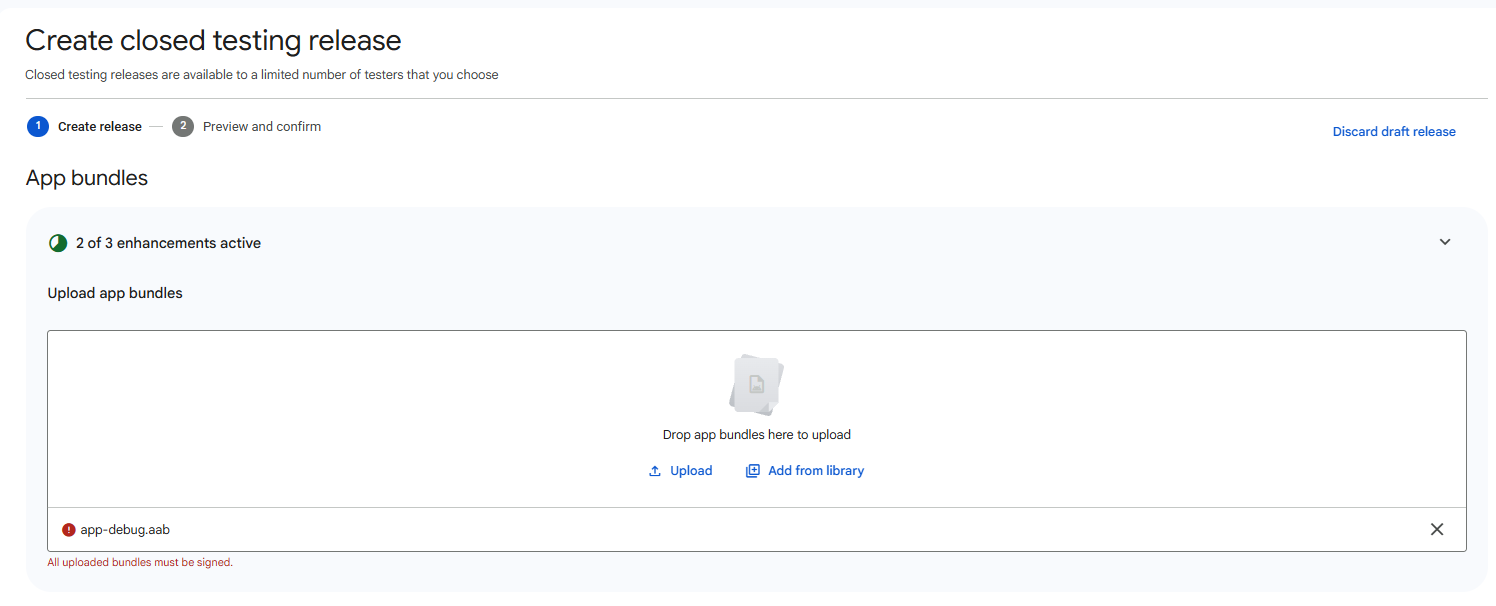
Play Console distinguishes between three closely related build rejections right under the upload box:
Signed with Android's default debug key (
androiddebugkey):You uploaded an APK or Android App Bundle that was signed in debug mode. You need to sign your APK or Android App Bundle in release mode.
No signature attached at all:
All uploaded bundles must be signed.
(Via the Publishing API, Fastlane, or CI tools:
The Android App Bundle was not signed.)Debugging left enabled in the manifest (
android:debuggable="true"):You uploaded a debuggable APK or Android App Bundle. For security reasons you need to disable debugging before it can be published in Google Play.
Below is how to create a compliant upload keystore once and wire it cleanly into Flutter, Android Studio, Expo / React Native, and Unity.
1Create a valid upload keystore (.jks)
Unless you build in the cloud with Expo EAS (which generates and stores a keystore for you automatically), generate a dedicated upload keystore using keytool, included with Android Studio's bundled JDK:
keytool -genkeypair -v -keystore upload-keystore.jks -keyalg RSA -keysize 2048 -validity 10000 -alias upload
Two details here save you from an immediate second rejection:
Never omit
-validity 10000: Without-validity,keytooldefaults to 90 days. Google Play rejects any certificate expiring before October 22, 2033 with:You uploaded an APK or Android App Bundle signed with a certificate that expires too soon. You need to sign your APK or Android App Bundle with a certificate that expires farther into the future.
Passing
-validity 10000(~27 years) alongside-keyalg RSA -keysize 2048satisfies both Google Play's expiry and key-strength checks.Back up
upload-keystore.jksand both passwords right now: The moment you upload your first.aab, Play App Signing locks this certificate'sSHA-1fingerprint as your app's upload key. Losing this file or generating a new.jkson another machine will block future updates—see our wrong signing key (SHA-1 mismatch) and 48-hour reset guide.
2Flutter: replace the default debug signingConfig
Flutter triggers signed in debug mode more than any other framework because flutter create intentionally sets signingConfig = signingConfigs.getByName("debug") inside buildTypes.release so flutter run --release works without setup. As a result, flutter build appbundle --release succeeds locally while signing app-release.aab with debug.keystore.
Step 1 — Place the keystore and create android/key.properties
Copy upload-keystore.jks into android/app/upload-keystore.jks (or keep it outside your repo and write its full path using forward slashes /, even on Windows), then create android/key.properties:
storePassword=your-keystore-password
keyPassword=your-key-password
keyAlias=upload
storeFile=upload-keystore.jks
(Relative storeFile paths in android/app/build.gradle.kts resolve from android/app/, not android/.)
Step 2 — Keep credentials out of Git
Add both entries to .gitignore before committing:
**/android/key.properties
**/*.jks
**/*.keystore
Step 3 — Wire signingConfigs.release in android/app/build.gradle.kts
Open android/app/build.gradle.kts, load key.properties above the android block, and switch buildTypes.release from "debug" to "release":
import java.util.Properties

val keystoreProperties = Properties()
val keystorePropertiesFile = rootProject.file("key.properties")
if (keystorePropertiesFile.exists()) {
    keystorePropertiesFile.inputStream().use { keystoreProperties.load(it) }
}

android {
    // ...
    signingConfigs {
        create("release") {
            keyAlias = keystoreProperties.getProperty("keyAlias")
            keyPassword = keystoreProperties.getProperty("keyPassword")
            storeFile = keystoreProperties.getProperty("storeFile")?.let { file(it) }
            storePassword = keystoreProperties.getProperty("storePassword")
        }
    }

    buildTypes {
        getByName("release") {
            signingConfig = signingConfigs.getByName("release")
        }
    }
}
(Older Flutter projects using Groovy android/app/build.gradle: define signingConfigs { release { ... } } and replace signingConfig signingConfigs.debug with signingConfig signingConfigs.release inside buildTypes.release.)
Step 4 — Clean and rebuild
flutter clean
flutter build appbundle --release
Upload build/app/outputs/bundle/release/app-release.aab.
3Android Studio, Expo, and React Native
Android Studio (Native Kotlin / Java)
Clicking Build > Generate App Bundles or APKs > Generate App Bundle(s) (or Build Bundle(s) / APK(s) > Build Bundle(s) in older Android Studio versions) without a signingConfig produces an unsigned app-release.aab (All uploaded bundles must be signed.). Fix it in either of two ways:
- UI wizard: Choose Build > Generate Signed App Bundle or APK → Android App Bundle → select
upload-keystore.jksand youruploadalias → choose thereleasebuild variant. - Gradle CLI / CI: Add the
signingConfigsandbuildTypes.releaseblock from Section 2 toapp/build.gradle.ktsso./gradlew bundleReleasealways outputs a signed bundle underapp/build/outputs/bundle/release/.
Expo (EAS Build)
Build with the production profile so EAS generates and manages a 2048-bit upload keystore for you:
eas build --platform android --profile production
Do not upload artifacts built with --profile development or local npx expo run:android (which sign with debug.keystore and enable debugging), and make sure the production profile in eas.json does not force "buildType": "apk".
Bare React Native (without EAS)
Like Flutter, the React Native template sets signingConfig signingConfigs.debug inside buildTypes.release in android/app/build.gradle. Define signingConfigs.release reading credentials from gradle.properties, point buildTypes.release.signingConfig to signingConfigs.release, and run ./gradlew bundleRelease inside android/.
4Unity: Custom Keystore and Development Build
Unity splits release signing and debug flags across two different menus—missing either one triggers an immediate rejection:
- Enable Custom Keystore: Open Edit > Project Settings > Player (Android tab) > Publishing Settings, check Custom Keystore, select your
upload-keystore.jks(or create one via Keystore Manager), and select youruploadalias and passwords. - Turn off Development Build and export
.aab: Open File > Build Settings (Build Profiles in Unity 6), check Build App Bundle (Google Play), and uncheck Development Build (as well as Script Debugging).
5Still seeing "debuggable"? Check these 3 places
If your .aab is now signed with your release keystore yet Play Console still displays You uploaded a debuggable APK or Android App Bundle..., check these three spots:
- Uploaded from
bundle/debug/by mistake: Building both variants leaves two.aabfiles on disk. Verify you selectedbundle/release/app-release.aaband notbundle/debug/app-debug.aab. - Hardcoded
android:debuggable="true": Checkandroid/app/src/main/AndroidManifest.xmland delete any manualandroid:debuggable="true"attribute on<application>, and confirmisDebuggable = true(debuggable true) is not set underbuildTypes.release. - Dev client or Development Build left on: Confirm Development Build is unchecked in Unity, or
"developmentClient": trueis not set on theeas.jsonprofile you built in Expo.
Quick local check before re-uploading: Run jarsigner -verify -verbose -certs app-release.aab. If the output lists CN=Android Debug, the bundle is still signed with the debug key; if it shows your own certificate subject and ends with jar verified., your signature is ready for Play Console.
Bundle uploaded? What comes next
Once your .aab clears Create release, click Next to Preview and confirm. If Play Console stops you on another check—such as duplicate versionCode, 16 KB memory page sizes, AD_ID permission declarations, or yellow R8 / debug-symbol warnings—find the exact message in Google Play Console AAB Upload Errors: Causes and Fixes, or bookmark our wrong signing key (SHA-1 mismatch) guide before moving computers or CI pipelines.
For personal developer accounts, getting your closed testing release live starts the 14-day clock: Google requires at least 12 testers opted in for 14 days continuously before you can apply for access to production—see 12 Testers for 14 Days: What "Continuously" Really Means.
Instead of chasing testers one by one across forums or setting up separate email lists, you can join a 16-developer Team mode squad on BetaLobby (free, no paid plans): everyone shares one Google Group, installs each other's apps on real Android devices, and completes a daily check-in across all 14 days.